natural dressage

It’s All About the Angle!

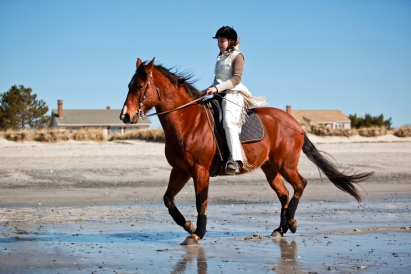
205074_215028601843579_195694623776977_908617_1093775_nI recently had the opportunity to ride in a clinic with Classical Dressage instructor Georges Malleroni at the lovely Kennebec Morgan Farm in Woolwich, ME.  I choose my clinics wisely nowadays, and have greatly enjoyed the two lessons I have had with this fellow.  I find that right after a clinic or a successful lesson, my mind is often a jumble, and if someone asked me what I learned, I’d be hard pressed to tell them.  It is usually only after a little while, and some more rides that the lesson emerges.  The best lessons can often be expressed in a few concise words or concepts, and I either experience it while riding in the clinic, or during a later ride.  In this clinic, my “aha!” moment was while riding.

We were working on improving the symmetry and straightness of my horse Gabe, and I was struggling to consistently get the elusive feeling of lightness and energy that emerges when your horse is truly straight.  We were working on very slow precise steps of shoulder in, which some may know, I am a big fan of as a very helpful movement.  Then Georges stated emphatically, “It’s all about the angle, a little more or a little less, there is nothing. You have to get it just right for it to work.”  This was my “aha!” moment.  While schooling the shoulder in, there would be moments where it all felt right, and Gabe was light and forward – as if he switched into a higher gear, and I felt perfectly balanced and quiet, but it was hard for me to understand why those moments happened when they did.  But then Georges told me – “It’s all about the angle.”  And of course, he was right.  When I rode Gabe at a specific angle in relation to the arena wall, it allowed his inside hind to step under and engage in a very productive way which was just not possible at “a little more, or a little less” of an angle.  Of course, he also had to be straight through his body, my timing had to be on, and the angle of my body also had to be correct.  But what it really came down to was the angle…

This comment “It’s all about the angle,” resonated with me so greatly because it is something I say to my students a lot also, about about their body position when doing groundwork with their horse.  When the human’s body position and the horse’s body position combine to create a correct maneuver, that is when we get moments of true lightness and clarity, whether we are mounted or on the ground.  I liken it to watching a Border Collie move a herd of sheep.  There is a very precise position where the dogs presence causes the herd to move – a very precise angle of dog in relation to the herd.  At that point, the energy of the herd of sheep is fluid and they move as one, any more, or any less and there is chaos.

When working on the ground with your horse, whether it is with a rope halter and lead, or a lunge line, or long lines, pay attention to the angle of your shoulders in relation to your horse.  I find that most behavioral or movement problems when using any of these tools can be corrected by adjusting the angle of your shoulders.  I tell my students to imagine “lightsabers” extending from their shoulders out in a straight line towards their horse.  Your body should be parallel to your horses when they are circling you – i.e you should be facing their belly.  Think of this position as “neutral.” From that position, you can then alter the angle of your body to influence their movement.  If you want them to halt or slow down, you can close your  leading shoulder – i.e swing your shoulder that is closest to their head gently towards them.  By doing that, you are essentially closing an energetic door in front of them and they will respond accordingly.  If your horse does not want to go forward while circling you, check that shoulder. Often, it is not open, so your energy is telling them to not go.

Your other shoulder (the one closest to the rear of the horse)  acts mostly as a driving aid.  If you want your horse to turn and face you, or step under with their inside hind, or disengage their hindquarters, or whatever you want to call it, close that shoulder.  Meaning, bring that driving shoulder towards their hind end – your body should become more perpendicular to theirs if you do that.  If your horse is turning and facing you when you don’t want them to, check the angle of that shoulder, usually therein lies the problem.   If you imagine the lightsabers extending from each shoulder, your horse should stay within the angle made.  Adjust the angle to change their position.

The combination of your correct angle and theirs is synergistic – it creates an energy that is greater than that of just you and your horse.  Perhaps this sounds complicated, but once you feel it, the simplicity of it becomes apparent.   And that is precisely it. It all makes sense once you feel it.  When you have the angle right, your horse will move off of your body cues lightly and effortlessly and it begins to feel like dancing.
Breathe Deep, Center Yourself, Stay Soft and Ride!

IMG_7298


Previously, I listed three key ingredients that I feel are important to develop as a rider.  We have discussed the importance of straightness, and now it is time to focus on the value of breathing properly, and the development and use of ones “core.”  When I use the term “core,”  I’m not talking about developing a six pack, or the need to have super strong abs.  Some “traditional” core strength is very helpful, but my focus in this article will be on developing your core energetically.  Learning to release tension in your body and breathe more effectively will make a HUGE difference in the quality of communication you have with your horse – whether you are riding, or working with them on the ground.  It will also improve every other aspect of your life.  This may sound grandiose and abstract, but it really isn’t.  The quality of energy, centering and breathing that is beneficial in horsemanship can be learned through many traditional martial arts techniques – and there are many books, videos, and clinics out there now that make that very connection.  Two of my favorite trainers and writers have really focused on this connection.  Mark Rashid, noted natural horsemanship trainer, has integrated Aikido principles into his teaching, and I recommend you read some of his books, attend a clinic, and/or watch some of his videos on the subject.  Mark Russell, a trainer that works within the world of “natural dressage,”  uses the principles of Tai Chi in his teaching.  He also holds clinics, and has produced interesting videos and articles on using Tai Chi to improve your riding.

Too often, I see tense riders that have forgotten how to breathe.  These riders have a center of balance that is very high in their shoulders, and unfortunately their horses mirror that tense energy and are often also not breathing properly.  Mark Russell uses the visual of a pyramid to explain this concept.  When we are tense as riders, not breathing properly and not using our core effectively, we are essentially shaped like an upside down pyramid.  Our breathing and balance are up in our shoulders, we are too “in our head”, and being that top heavy does not center us on our horse.  When you breathe in and out of your chest, it is very hard to take deep breaths.  Too much thinking, and not enough feeling exacerbate this imbalance.  The goal is to be an upright pyramid.  This is a much more grounded, balanced position, and really allows us to ride our horses in a much more harmonious way.  But how do you accomplish this??

The first step is to focus on bringing your energy down below your belly button.  This is bringing your energy down into your “core.”  While standing unmounted, practice loosening your shoulders, softening your knee and hip joints, and taking deep breaths that expand and contract your belly below your belly button, at approximately where the top of your hip bones are. Focus on the image of an upright pyramid, and feel the centering weight travel lower in your body, so that your stability mimics that of the base heavy pyramid.  Mark Russell describes this process as rooting – and think of it in just this way – imagine roots extending out of your feet that figuratively ground you.  As you practice this on the ground, have someone try to gently push on you before and after you focus on bringing your center of balance lower.  You should feel a marked improvement in your stability.  This improvement will carry over into your riding as well, it might take a bit of practice for it to feel natural, but in time it will.

The first step in improving is awareness.  You will find that if you just pay attention to staying softer, and breathing deeper while you ride, you will improve.  Remember to always check the tension in your joints, keep them open and supple.  Breathe deep and low, and focus on bringing yourself out of your “thinking brain” and into your “feeling body.”  Imagine that you are not just centering yourself “over” your horse, but rather center yourself “through” your horse, deep into the ground.  Remember that the horse will mirror the energy, breath and softness of the rider or handler.  So if they are tense, you are likely tense as well, and vice versa.  As with anything, the proof is in the pudding, so just play with these concepts, and I bet you will feel a difference.

One of the benefits to improving our breathing, balance and core control is that then we can use intentional tension as a tool through the concept of a half halt.  For years, the term “half halt”  was this mystical concept that my instructors always barked at me, but never bothered to truly define.  I never asked any of them what they really meant, because it was always implied that I should know.  I know that this was a failing on my part in my role as a student, but honestly, I am not sure that my instructors would really have been able to explain it to me anyways.  When I ask my students now if they understand what a half halt is, how it is executed, and what the purpose is, I get many responses, but most are muddy at best.  Most often, people describe the half halt as a momentary squeezing/tightening of the reins accompanied by leg aids.  Some emphasize that it is the inside leg and outside rein, some define it a bit differently, but most definitions miss the true point of a half halt.

Most commonly seen in the world of dressage, the half halt is a skill that is used by all good horse people, whether they know it as such or not.  At its simplest, it is a momentary resistance by the rider against the horses energy.  It can be used to rebalance a horse before executing a new movement, it can be used to recycle the energy of the horse and lighten the forehand and add more energy to the hindquarters, and it can be a call to attention to the inattentive horse.  The half halt MUST start in the core though, for it to be truly effective.  I teach my students to engage their core momentarily.  If you are doing this properly, you will feel taller for a moment – so sometimes it is helpful to imagine that you are pushing your belly button upward and outward, without hollowing your back.  This moment of resistance must be just that – a moment.  Continual bracing will get you nowhere, but you can repeat after releasing.  Depending on how sensitive the horse is to this aid, the resistance can travel down your outside arm, or both arms, into the reins and to the horses mouth.  If you execute your half halt in this
way – from your core to the horses mouth versus just pulling on the reins, you are staying grounded and centered and can utilize that strength to accomplish more with less.  I find that if you approach your half halts this way, you will need less of the “driving aid” that so often accompanies most definitions of the half halt.  Play with your horse, and you can find the exact formula that works for you, but remember that it must come from the core first, and must be momentary.  This momentary application of tension, or resistance, will only be effective if it contrasts with your regular riding position, which brings us back full circle to why it is so important to breathe deep, center yourself, stay soft and ride!


IMG_7214

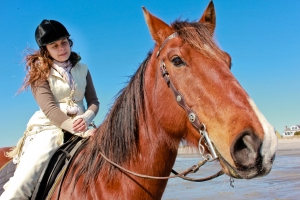
Still too bracey in the poll, because I was not centered enough, and was relying too much on my reins…


Take That Basket of Crooked and Juice It! (i.e making lemonade, and straight horses)

Last month I left you all with the homework of mapping you and your horses physical asymmetry.  That likely produced a whole bunch of information, but now the question is, what to do about it? This month, we will focus on making some delicious lemonade from all those lemons you gathered.  Remember that information is good, as it will help you become a more aware (and consequently more symmetrical and straight) rider.  Lets discuss some activities and exercises that will address all the crookedness we have in our bodies and our horses bodies.

First, on the subject of ourselves, there are some excellent books out there that address yoga and pilates for equestrians.  These can be very beneficial in finding some appropriate exercises for your bodies crookedness.  I have had great luck in fixing my own asymmetry through the use of chiropractics and massage.  As anyone who  has ridden in my saddle can attest to, one of my legs is longer than the other, so one of my stirrups was always adjusted 1 hole lower.  Recently, by getting some good massages, and some excellent chiropractic work, that is no longer the case.  My sciatic nerve pain that accompanied this is also gone – which has been a godsend.  Just being aware of your crookedness should help fix some of it.

Pay attention to your bodies symmetry when in the saddle especially.  Sylvia Loch, author of “Dressage in Lightness,” suggests that you align the zipper on your jacket and breeches with your horses wither. I find that to be a helpful visual.  The softer you are through your body, the less tension you hold in your joints, the more symmetrical and straight you will be.  When you mount up, spend a minute stretching and aligning your body.  Lift your legs off of the saddle and make sure they hang softly from your psoas muscle, through your hip joint, your knee and your ankle.  Educate yourself about the importance of the psoas muscle and it’s connection to physical tension and stress.  Perhaps that is a subject for another article another day… As you soften through your body, you might even have to let out your stirrups a hole, and you should begin to feel taller.  Check your shoulders, neck, elbows, wrists and fingers for excessive tension.  Soft heavy joints are crucial to a relaxed, straight, effective rider.  If you are tense you will kill the lightness and impulsion in your horse, and will not be able to feel them.  We will go into this in more detail next month.

For now, we will focus for the rest of the article on the horse.  In the horses body, asymmetry is caused by two related reasons.  First, there is structural asymmetry that should first be addressed by good bodywork.  I find the skill and feel of the practitioner is more important than the specific modality used. I have had success correcting crookedness employing chiropractic work, acupuncture, massage, essential oils, dental work, farrier work, and the Masterson Method among others.  Find what combo works for your horse, and then check in on their body regularly with it.  That should always be the first step in working towards straightness.

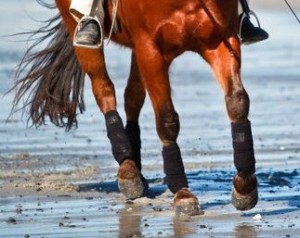
After we address the underlying structural asymmetry, or at least begin to, then we must address and retrain the muscle memory of the horse.  That is where the exercises I will be suggesting come in to play.  They all have one thing in common.  They focus on strengthening the inside hind leg.  Why is this so important you might ask?  Well, when a horse walks straight along a wall, their outside shoulder will naturally align with the wall. A horse is wider behind than in front though, so by aligning their shoulder with the wall, their hips will track to the inside.  This will encourage their inside hind leg to play a very passive role in supporting the weight and balance of the horse.  Biomechanically speaking, it is way better for the horses body if the hind legs step under the horse more, towards the center line, and under the weight of the haunches.  Now I’m not suggesting any sort of weird contortion on the horses part, as that would obviously put undue stress on their joints.  What I am saying though is, that most horses do not step under that balance point naturally, especially if not trained to do it early on.  This results in a weak hind end, and a horse that drags itself along, and is heavy on the front end.   And don’t think that if you are a trail rider you are off the hook – because it happens on the trail as well.  The “wall” on the trail is just the edge of the trail… Naturally, because we are talking about crookedness here, most horses will have an especially hard time stepping under with either their left or right hind leg.  Jim Masterson says that most horses are “right front, left hind horses,” which means that it is harder for them to step under their body with their right hind.

So how do we fix this?  First, learn what shoulder fore is, and then ride in shoulder fore whenever you are trying to ride straight in a specific direction.  And no, this does not apply only to stuffy dressage riders.  Everyone should know what shoulder fore is, and every young horse should be taught shoulder fore early on in their education. Simply put, all you are doing in shoulder fore is moving your horses shoulders slightly to the inside.  This simple adjustment will align the horses shoulders with their haunches.  Google some images of shoulder fore if this is confusing to you.  It is important to bring the shoulder in off the wall, rather than push the hindquarters to the outside for the shoulder fore to be effective.  Using the outside rein almost as if you were neck reining will help with this.  In this simple and perhaps boring exercise, we will be laying the foundation for symmetry, strength and lightness in our riding.

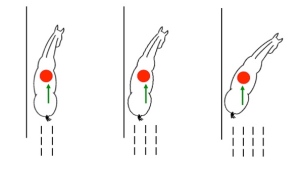
After mastering the shoulder fore, learn about and practice the “shoulder in” – which is essentially auntie or uncle shoulder fore.  In shoulder in, the horse essentially is at an angle of 30 degrees to the wall, bent around the riders inside leg, and looking away from the direction of travel.  This should place the horses steps on “three tracks,” meaning that the outside hind will make one track,  the inside hind will follow in the track of the outside front leg, and the inside front leg will make the third track.  “Four tracks” would result in more of an angle off the wall, and is also acceptable.  Again, visuals are super helpful, so fire up the mighty Google, and search away.

Left to right:  Shoulder fore,  Shoulder in on 3 tracks, Shoulder in on 4 tracks.

Left to right:
Shoulder fore,
Shoulder in on 3 tracks,
Shoulder in on 4 tracks.

Second, we fix our horses muscle memory of crookedness by incorporating LOTS of circles, serpentines, and changes of rein into our riding.  If you think about it, when circling, it will be much easier for the horses inside hind to reach under their body and support the weight of their hind end.  With that in mind, I find the following exercises to be very helpful in developing straightness.

Ride every corner, whether it is on a trail, in a field, or in an arena as a right angle.  There are two ways to ride a corner: First, ask your horse to step to the inside with their outside front leg.  This should not result in them dropping their inside shoulder, rather it should feel like their outside shoulder is pushing to the inside.  This is a feeling that will be familiar to those who neck rein, and will feel less familiar to those who direct rein.  This movement emphasizes the importance of the outside rein.  On the next corner, ask your horses inside hind leg to step under and towards the outside of the bend they are on. These two ways of executing a corner should feel very different to you, and really help you learn to control your horses feet. Remember, they have four feet, and the more comfortable you are controlling each one independently, the easier everything will become.

Ride a figure eight, using the concepts mentioned above on the bend, and imagine that you are a pinball being released as you approach the diagonal of the figure eight.  Focus on symmetry and straightness across the diagonal and impulsion will come.  The more your horse steps under equally with both hind legs, and the more supple their back is, the better this will feel.  Remember to organize using half halts to collect before the next bend.

Ride a 20 meter circle and slowly spiral in by asking your horses outside shoulder to step to the inside.  Again, this requires you to pay attention to the function of the outside rein.  Before your circle begins to feel to small, slowly spiral back out, asking your horses inside hind to step under their body, without letting their energy blow out through their outside shoulder.

Now I know that I just dropped a lot of stuffy “technical” terminology, and perhaps those of you not familiar with it have already stopped reading.  But I encourage you to use this article as a template from which to develop questions. Regardless of what type of riding you prefer, these exercises WILL help both you and your horse.  If it’s completely and utterly confusing, contact an instructor you like and trust and ask them to explain more.  I find this all very difficult to explain and understand in writing, but once you see it visually through diagrams or by watching another rider, and especially once you FEEL it while riding yourself, it is much easier to understand.  Play with these concepts first on the ground as well – then mount up and try them while riding. And feel free to ask me via e-mail or phone for clarification as well.  Finally, know that addressing issues of straightness will result in a healthier and stronger body for both you and your horse.  This will lead to way more enjoyment in the long run…

IMG_7270


Nagging is a No No

Nagging is something that we all do at one time or another, both while working with our horses and just in life in general.  One of the riding instructor’s most important jobs, in my opinion, is to help their students remember to not nag. First off, how do I define “nagging?”  To me, it comes down to unclear repetitive use of the rider’s aids with little or no release.  For example – someone who clucks repeatedly at their horse as they trot around is nagging.  If you squeeze with your leg at every stride you are nagging.  If you seesaw on your horses mouth continually with your hands you are nagging. All of these actions do one thing, they dull the horse to your aids and cause them to brace.

In the world of horses I see nagging arise for two reasons.  First, riders often are trying to be kind or nice to their horse by applying aids more gently – but end up having to apply them repetitively to hold their horse up.  Second, riders often nag from a position of being unaware.  Most riders that nag aren’t even aware they are doing it, as it has become second nature.  And guess what?? Your horse has tuned you out too, so they are not aware either.  Nagging riders create dull horses, and dull horses are a real bummer to ride.  Why do you think a lot of school horses are dull?  Because they have essentially tuned out because of repetitive nagging and inconsistent aids.  All the time I see people pass judgement about horses that have gotten to this point who claim that it is the horses personality, not a learned behavior.  Granted, I do think that some horses are more prone to becoming especially dull – but I often find that it is actually really sensitive horses that become dull as a protective mechanism.

So lets return to our two reasons for dullness.  First – the rider is trying to be “kind” with their aids.  In my training, I have a very specific sequence of aids.  First, I ask with my voice.  Second, with my physical aids – i.e leg, reins seat etc… Third, I follow through with a tap of the whip. If the horse doesn’t respond, I up the ante until they do.  That might sound harsh, so let me clarify two things.  First, it is imperative to be very cognizant of whether you horse understands what you are asking.  It’s not fair to up the ante if your horse simply doesn’t understand what you are asking.  Second, upping the ante doesn’t mean beating a horse.  If that triple sequence of aids doesn’t work, there is likely confusion or pain on the horses part and you must address that before proceeding.

STAY TUNED FOR PART TWO – ADDRESSING SOLUTIONS AND RIDER AWARENESS – I.E INTENTIONAL RIDING