awareness

The More You Learn, The Less You Know

As some of you reading this may have noticed, this is the first article I have published on my blog in a little over a year.  A large part of that hiatus is due to the fact that I had my second child in March of 2014, and the reality of two kiddos and multiple jobs has left little time for extra-curricular activities.  But this pause in writing has mainly been caused by an extended period of questioning and  inward thought that I am just now forcing myself to emerge from.  They say that the more you learn, the less you know.  As I have progressed in my journey of horsemanship, I find myself questioning absolutes more and more with every passing day.  Every horse I work with adds another perspective and dimension, and another example that does not fit within the box that utilizing one specific technique creates.

This reality is hard to reconcile as a professional trainer and instructor. We are paid to have the answers, and lately, I find it harder and harder to say that I possess the one and only magic answer.  And frankly, a lot of the time, I feel that is what people are looking for.  We all know we live in a society of instant gratification, and there has been much discussion even within the horseworld of the  constant search for the quick fix to whatever the “problem” is.  “I don’t know,” and “it depends”  are not comforting statements when you are searching for the answer to whatever problem you are dealing with.  I get that, and I also am prone to looking for the quick fix – after all, I am a human.

The challenge as an instructor has always been how to create enough structure and offer enough guidance to encourage the student seek out a solution that works for them and their horse.  When I was a younger rider, I didn’t always know the WHY behind what I was told to do, but I could win plenty of blue ribbons under the guidance of my “competent” trainers.  I only began to understand the “whys” when I brought my horses home and encountered challenging situations and had to push through them without someone telling me how to do it.  Those situations encouraged and fostered an independent and experimental thought process that has been crucial in my development as a horse person.  Sometimes, I got it completely wrong, but you can be sure I learned something from that!  And sometimes I got it right – even partial success leads to learning.

So now, as I progress as an instructor, I am learning to play with that balance.  Facilitating “teachable moments” – moments where the student feels safe and comfortable, or maybe just brave enough to try something, even if it might not lead to immediate success.  I find that “it depends” is an answer that has caused me to lose some students, and there are moments where that makes me sad.  I used to think that I was the right teacher for everyone, and while I would still love to be the right teacher for everyone, I now know that I am not, and that is ok.  I am no longer willing to think for my students.  I pledge to do my best to keep them safe, and help them feel comfortable asking why, and will encourage them to try something, even if the try doesn’t lead directly to success.  But I will not think for them, and will try my darnedest to not dictate absolutes, because there are really none.  This makes some uncomfortable, and I have to remind myself to be ok with that, for to be a true teacher you must help open your students eyes and allow them to think.

Breathe Deep, Center Yourself, Stay Soft and Ride!

IMG_7298


Previously, I listed three key ingredients that I feel are important to develop as a rider.  We have discussed the importance of straightness, and now it is time to focus on the value of breathing properly, and the development and use of ones “core.”  When I use the term “core,”  I’m not talking about developing a six pack, or the need to have super strong abs.  Some “traditional” core strength is very helpful, but my focus in this article will be on developing your core energetically.  Learning to release tension in your body and breathe more effectively will make a HUGE difference in the quality of communication you have with your horse – whether you are riding, or working with them on the ground.  It will also improve every other aspect of your life.  This may sound grandiose and abstract, but it really isn’t.  The quality of energy, centering and breathing that is beneficial in horsemanship can be learned through many traditional martial arts techniques – and there are many books, videos, and clinics out there now that make that very connection.  Two of my favorite trainers and writers have really focused on this connection.  Mark Rashid, noted natural horsemanship trainer, has integrated Aikido principles into his teaching, and I recommend you read some of his books, attend a clinic, and/or watch some of his videos on the subject.  Mark Russell, a trainer that works within the world of “natural dressage,”  uses the principles of Tai Chi in his teaching.  He also holds clinics, and has produced interesting videos and articles on using Tai Chi to improve your riding.

Too often, I see tense riders that have forgotten how to breathe.  These riders have a center of balance that is very high in their shoulders, and unfortunately their horses mirror that tense energy and are often also not breathing properly.  Mark Russell uses the visual of a pyramid to explain this concept.  When we are tense as riders, not breathing properly and not using our core effectively, we are essentially shaped like an upside down pyramid.  Our breathing and balance are up in our shoulders, we are too “in our head”, and being that top heavy does not center us on our horse.  When you breathe in and out of your chest, it is very hard to take deep breaths.  Too much thinking, and not enough feeling exacerbate this imbalance.  The goal is to be an upright pyramid.  This is a much more grounded, balanced position, and really allows us to ride our horses in a much more harmonious way.  But how do you accomplish this??

The first step is to focus on bringing your energy down below your belly button.  This is bringing your energy down into your “core.”  While standing unmounted, practice loosening your shoulders, softening your knee and hip joints, and taking deep breaths that expand and contract your belly below your belly button, at approximately where the top of your hip bones are. Focus on the image of an upright pyramid, and feel the centering weight travel lower in your body, so that your stability mimics that of the base heavy pyramid.  Mark Russell describes this process as rooting – and think of it in just this way – imagine roots extending out of your feet that figuratively ground you.  As you practice this on the ground, have someone try to gently push on you before and after you focus on bringing your center of balance lower.  You should feel a marked improvement in your stability.  This improvement will carry over into your riding as well, it might take a bit of practice for it to feel natural, but in time it will.

The first step in improving is awareness.  You will find that if you just pay attention to staying softer, and breathing deeper while you ride, you will improve.  Remember to always check the tension in your joints, keep them open and supple.  Breathe deep and low, and focus on bringing yourself out of your “thinking brain” and into your “feeling body.”  Imagine that you are not just centering yourself “over” your horse, but rather center yourself “through” your horse, deep into the ground.  Remember that the horse will mirror the energy, breath and softness of the rider or handler.  So if they are tense, you are likely tense as well, and vice versa.  As with anything, the proof is in the pudding, so just play with these concepts, and I bet you will feel a difference.

One of the benefits to improving our breathing, balance and core control is that then we can use intentional tension as a tool through the concept of a half halt.  For years, the term “half halt”  was this mystical concept that my instructors always barked at me, but never bothered to truly define.  I never asked any of them what they really meant, because it was always implied that I should know.  I know that this was a failing on my part in my role as a student, but honestly, I am not sure that my instructors would really have been able to explain it to me anyways.  When I ask my students now if they understand what a half halt is, how it is executed, and what the purpose is, I get many responses, but most are muddy at best.  Most often, people describe the half halt as a momentary squeezing/tightening of the reins accompanied by leg aids.  Some emphasize that it is the inside leg and outside rein, some define it a bit differently, but most definitions miss the true point of a half halt.

Most commonly seen in the world of dressage, the half halt is a skill that is used by all good horse people, whether they know it as such or not.  At its simplest, it is a momentary resistance by the rider against the horses energy.  It can be used to rebalance a horse before executing a new movement, it can be used to recycle the energy of the horse and lighten the forehand and add more energy to the hindquarters, and it can be a call to attention to the inattentive horse.  The half halt MUST start in the core though, for it to be truly effective.  I teach my students to engage their core momentarily.  If you are doing this properly, you will feel taller for a moment – so sometimes it is helpful to imagine that you are pushing your belly button upward and outward, without hollowing your back.  This moment of resistance must be just that – a moment.  Continual bracing will get you nowhere, but you can repeat after releasing.  Depending on how sensitive the horse is to this aid, the resistance can travel down your outside arm, or both arms, into the reins and to the horses mouth.  If you execute your half halt in this
way – from your core to the horses mouth versus just pulling on the reins, you are staying grounded and centered and can utilize that strength to accomplish more with less.  I find that if you approach your half halts this way, you will need less of the “driving aid” that so often accompanies most definitions of the half halt.  Play with your horse, and you can find the exact formula that works for you, but remember that it must come from the core first, and must be momentary.  This momentary application of tension, or resistance, will only be effective if it contrasts with your regular riding position, which brings us back full circle to why it is so important to breathe deep, center yourself, stay soft and ride!


IMG_7214

Still too bracey in the poll, because I was not centered enough, and was relying too much on my reins…


Take That Basket of Crooked and Juice It! (i.e making lemonade, and straight horses)

Last month I left you all with the homework of mapping you and your horses physical asymmetry.  That likely produced a whole bunch of information, but now the question is, what to do about it? This month, we will focus on making some delicious lemonade from all those lemons you gathered.  Remember that information is good, as it will help you become a more aware (and consequently more symmetrical and straight) rider.  Lets discuss some activities and exercises that will address all the crookedness we have in our bodies and our horses bodies.

First, on the subject of ourselves, there are some excellent books out there that address yoga and pilates for equestrians.  These can be very beneficial in finding some appropriate exercises for your bodies crookedness.  I have had great luck in fixing my own asymmetry through the use of chiropractics and massage.  As anyone who  has ridden in my saddle can attest to, one of my legs is longer than the other, so one of my stirrups was always adjusted 1 hole lower.  Recently, by getting some good massages, and some excellent chiropractic work, that is no longer the case.  My sciatic nerve pain that accompanied this is also gone – which has been a godsend.  Just being aware of your crookedness should help fix some of it.

Pay attention to your bodies symmetry when in the saddle especially.  Sylvia Loch, author of “Dressage in Lightness,” suggests that you align the zipper on your jacket and breeches with your horses wither. I find that to be a helpful visual.  The softer you are through your body, the less tension you hold in your joints, the more symmetrical and straight you will be.  When you mount up, spend a minute stretching and aligning your body.  Lift your legs off of the saddle and make sure they hang softly from your psoas muscle, through your hip joint, your knee and your ankle.  Educate yourself about the importance of the psoas muscle and it’s connection to physical tension and stress.  Perhaps that is a subject for another article another day… As you soften through your body, you might even have to let out your stirrups a hole, and you should begin to feel taller.  Check your shoulders, neck, elbows, wrists and fingers for excessive tension.  Soft heavy joints are crucial to a relaxed, straight, effective rider.  If you are tense you will kill the lightness and impulsion in your horse, and will not be able to feel them.  We will go into this in more detail next month.

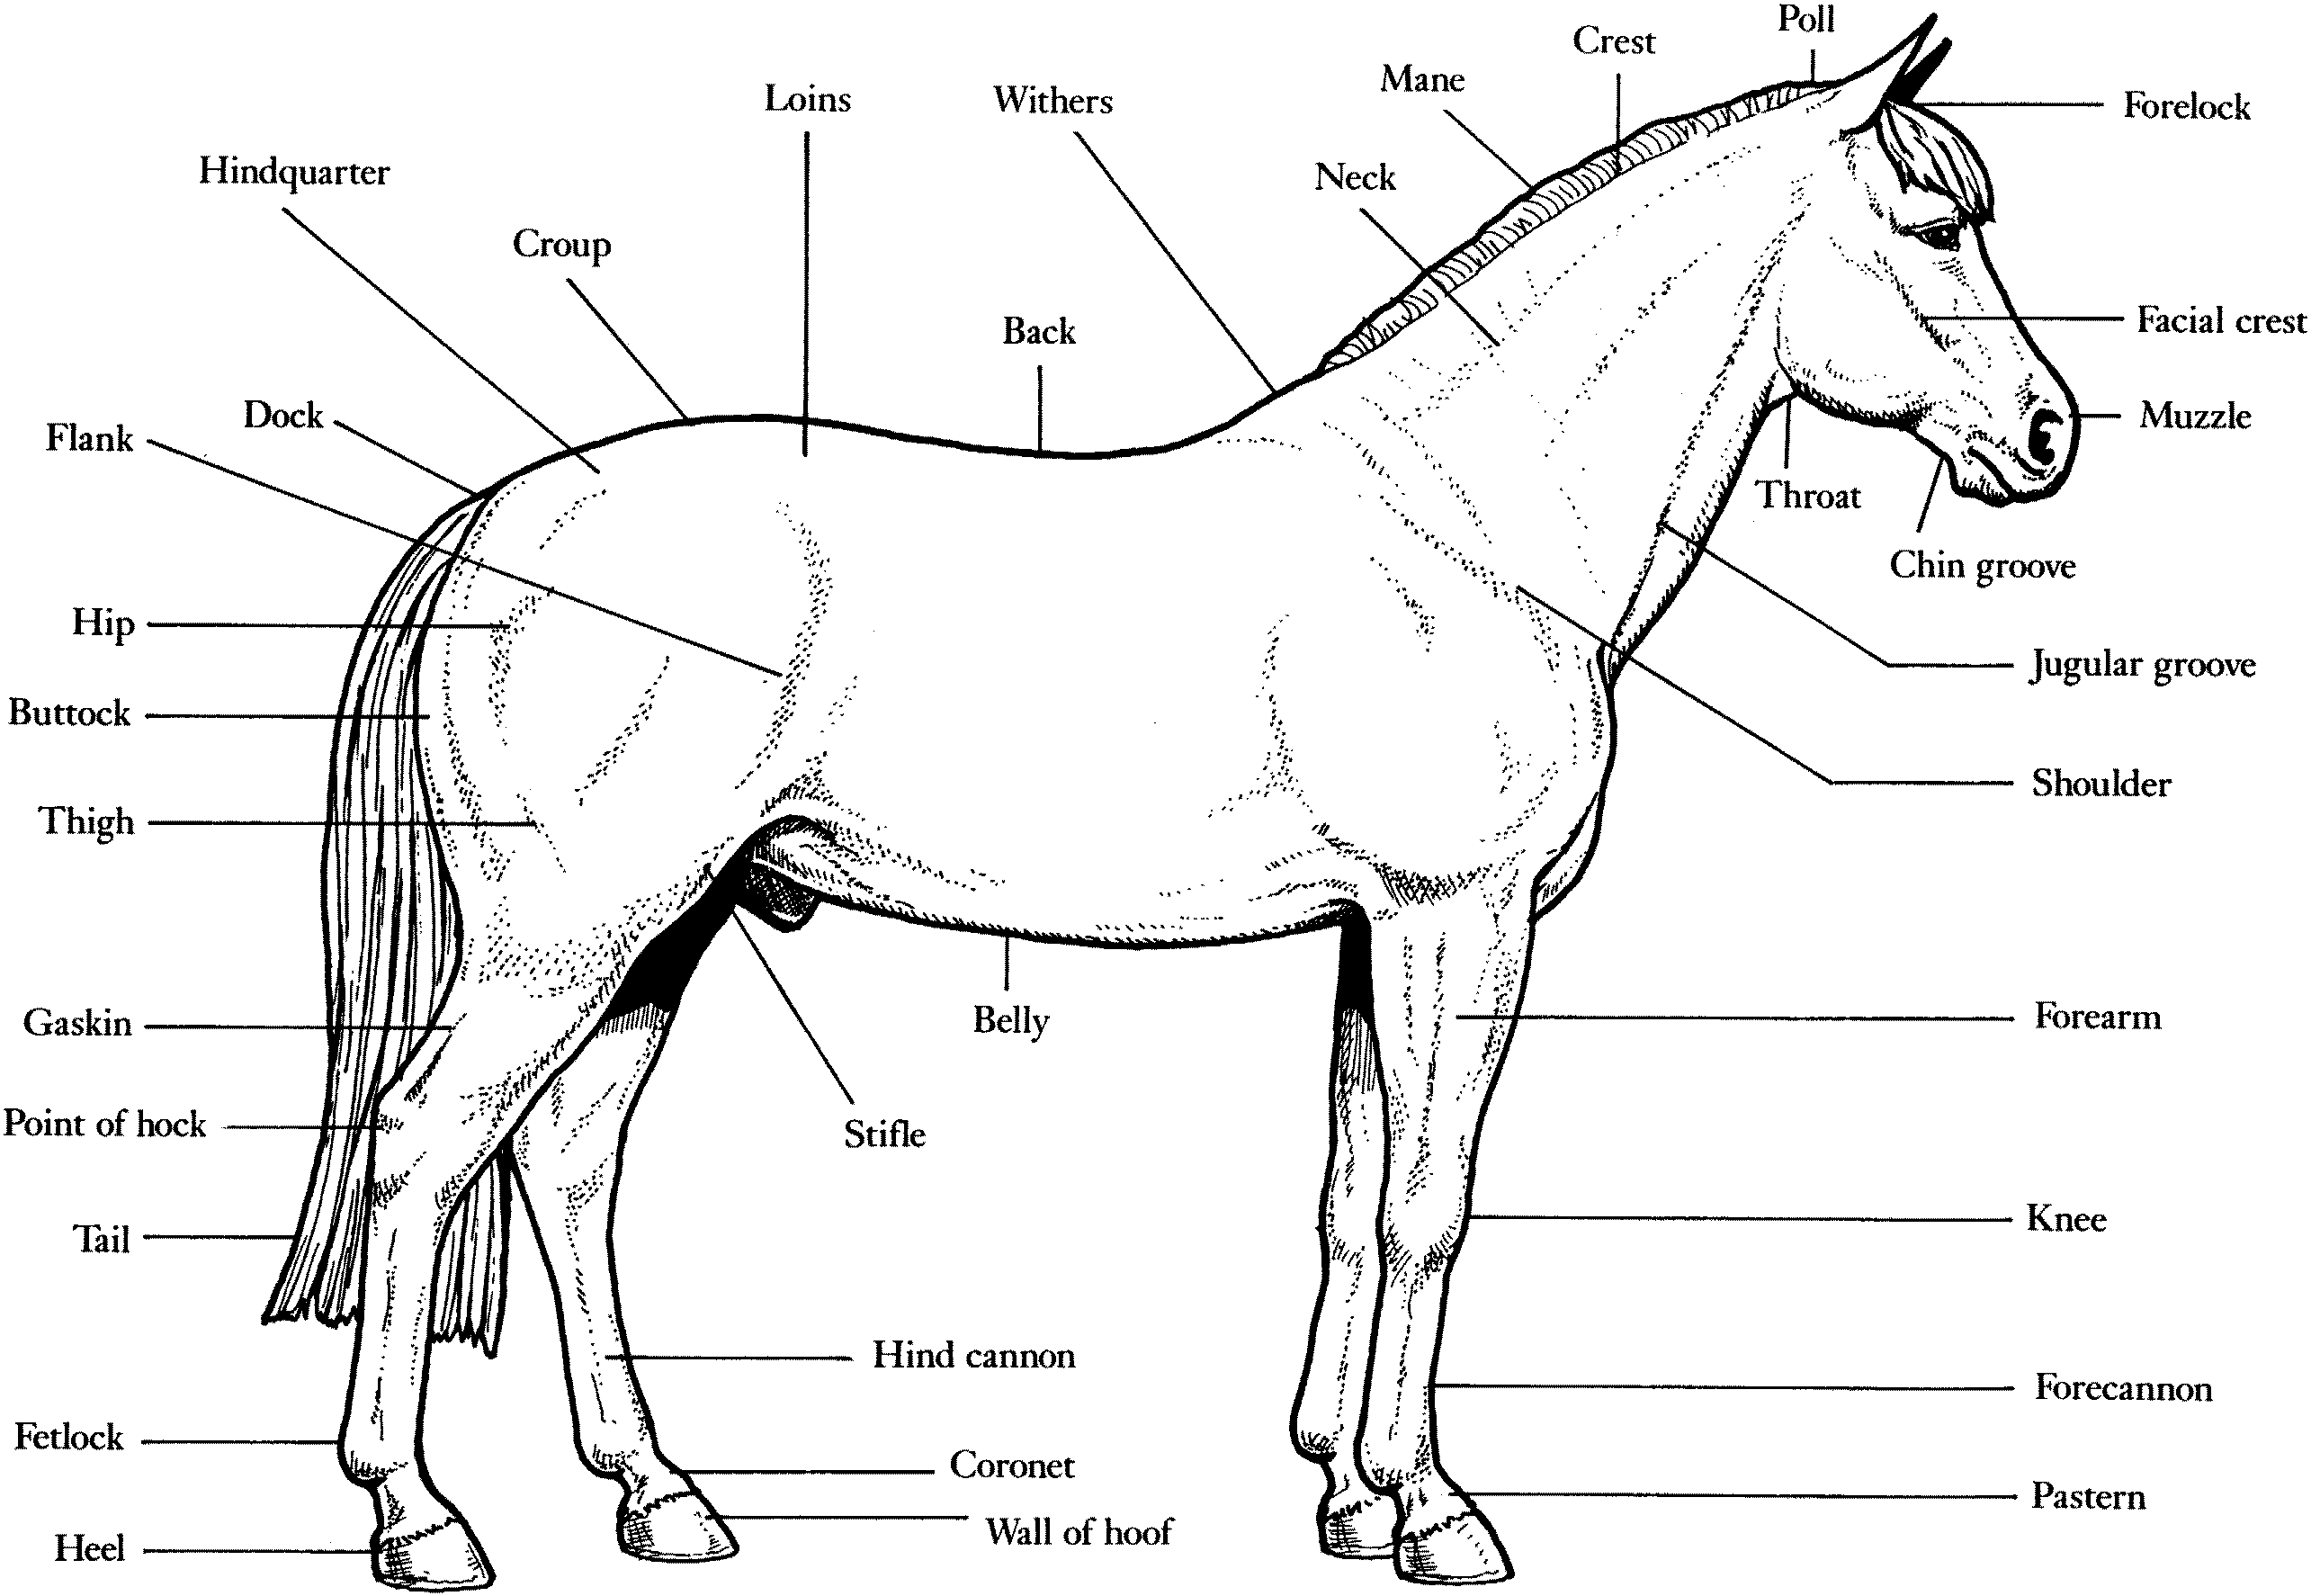
For now, we will focus for the rest of the article on the horse.  In the horses body, asymmetry is caused by two related reasons.  First, there is structural asymmetry that should first be addressed by good bodywork.  I find the skill and feel of the practitioner is more important than the specific modality used. I have had success correcting crookedness employing chiropractic work, acupuncture, massage, essential oils, dental work, farrier work, and the Masterson Method among others.  Find what combo works for your horse, and then check in on their body regularly with it.  That should always be the first step in working towards straightness.

After we address the underlying structural asymmetry, or at least begin to, then we must address and retrain the muscle memory of the horse.  That is where the exercises I will be suggesting come in to play.  They all have one thing in common.  They focus on strengthening the inside hind leg.  Why is this so important you might ask?  Well, when a horse walks straight along a wall, their outside shoulder will naturally align with the wall. A horse is wider behind than in front though, so by aligning their shoulder with the wall, their hips will track to the inside.  This will encourage their inside hind leg to play a very passive role in supporting the weight and balance of the horse.  Biomechanically speaking, it is way better for the horses body if the hind legs step under the horse more, towards the center line, and under the weight of the haunches.  Now I’m not suggesting any sort of weird contortion on the horses part, as that would obviously put undue stress on their joints.  What I am saying though is, that most horses do not step under that balance point naturally, especially if not trained to do it early on.  This results in a weak hind end, and a horse that drags itself along, and is heavy on the front end.   And don’t think that if you are a trail rider you are off the hook – because it happens on the trail as well.  The “wall” on the trail is just the edge of the trail… Naturally, because we are talking about crookedness here, most horses will have an especially hard time stepping under with either their left or right hind leg.  Jim Masterson says that most horses are “right front, left hind horses,” which means that it is harder for them to step under their body with their right hind.

So how do we fix this?  First, learn what shoulder fore is, and then ride in shoulder fore whenever you are trying to ride straight in a specific direction.  And no, this does not apply only to stuffy dressage riders.  Everyone should know what shoulder fore is, and every young horse should be taught shoulder fore early on in their education. Simply put, all you are doing in shoulder fore is moving your horses shoulders slightly to the inside.  This simple adjustment will align the horses shoulders with their haunches.  Google some images of shoulder fore if this is confusing to you.  It is important to bring the shoulder in off the wall, rather than push the hindquarters to the outside for the shoulder fore to be effective.  Using the outside rein almost as if you were neck reining will help with this.  In this simple and perhaps boring exercise, we will be laying the foundation for symmetry, strength and lightness in our riding.

After mastering the shoulder fore, learn about and practice the “shoulder in” – which is essentially auntie or uncle shoulder fore.  In shoulder in, the horse essentially is at an angle of 30 degrees to the wall, bent around the riders inside leg, and looking away from the direction of travel.  This should place the horses steps on “three tracks,” meaning that the outside hind will make one track,  the inside hind will follow in the track of the outside front leg, and the inside front leg will make the third track.  “Four tracks” would result in more of an angle off the wall, and is also acceptable.  Again, visuals are super helpful, so fire up the mighty Google, and search away.
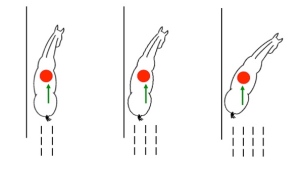
Left to right:  Shoulder fore,  Shoulder in on 3 tracks, Shoulder in on 4 tracks.

Left to right:
Shoulder fore,
Shoulder in on 3 tracks,
Shoulder in on 4 tracks.

Second, we fix our horses muscle memory of crookedness by incorporating LOTS of circles, serpentines, and changes of rein into our riding.  If you think about it, when circling, it will be much easier for the horses inside hind to reach under their body and support the weight of their hind end.  With that in mind, I find the following exercises to be very helpful in developing straightness.

Ride every corner, whether it is on a trail, in a field, or in an arena as a right angle.  There are two ways to ride a corner: First, ask your horse to step to the inside with their outside front leg.  This should not result in them dropping their inside shoulder, rather it should feel like their outside shoulder is pushing to the inside.  This is a feeling that will be familiar to those who neck rein, and will feel less familiar to those who direct rein.  This movement emphasizes the importance of the outside rein.  On the next corner, ask your horses inside hind leg to step under and towards the outside of the bend they are on. These two ways of executing a corner should feel very different to you, and really help you learn to control your horses feet. Remember, they have four feet, and the more comfortable you are controlling each one independently, the easier everything will become.

Ride a figure eight, using the concepts mentioned above on the bend, and imagine that you are a pinball being released as you approach the diagonal of the figure eight.  Focus on symmetry and straightness across the diagonal and impulsion will come.  The more your horse steps under equally with both hind legs, and the more supple their back is, the better this will feel.  Remember to organize using half halts to collect before the next bend.

Ride a 20 meter circle and slowly spiral in by asking your horses outside shoulder to step to the inside.  Again, this requires you to pay attention to the function of the outside rein.  Before your circle begins to feel to small, slowly spiral back out, asking your horses inside hind to step under their body, without letting their energy blow out through their outside shoulder.

Now I know that I just dropped a lot of stuffy “technical” terminology, and perhaps those of you not familiar with it have already stopped reading.  But I encourage you to use this article as a template from which to develop questions. Regardless of what type of riding you prefer, these exercises WILL help both you and your horse.  If it’s completely and utterly confusing, contact an instructor you like and trust and ask them to explain more.  I find this all very difficult to explain and understand in writing, but once you see it visually through diagrams or by watching another rider, and especially once you FEEL it while riding yourself, it is much easier to understand.  Play with these concepts first on the ground as well – then mount up and try them while riding. And feel free to ask me via e-mail or phone for clarification as well.  Finally, know that addressing issues of straightness will result in a healthier and stronger body for both you and your horse.  This will lead to way more enjoyment in the long run…

IMG_7270


An Exercise in Observation: Recognizing Crookedness In our Horses and Ourselves

In the past two years, I have been gifted with the opportunity to have observed many different horse and rider pairs.  Some I have watched only once, some I have watched evolve both physically and mentally over the course of  the two years.  This has been the most amazing learning opportunity, and has obviously really influenced my approach to training both horse and rider.  In being able to observe so many horses and riders, I have realized that there are a few key ingredients that are supremely important to develop.

#1 – Straightness in both horse and rider (or the lack thereof) is probably at the root of most issues.

#2 – Learning how to develop and use one’s core properly is essential for the rider.

#3 – Breathing properly is crucial for both horse and rider.

I will discuss these points individually within the next few posts.  First, lets look at the importance of straightness.

In the classical pyramid of training, straightness is very close to the top, but I feel that it is crucial to develop in both yourself and your horse from day one.  Before we can improve straightness in ourselves and in our horses, we must begin to recognise lack of straightness – or crookedness. This is where being able to observe so many horses and riders has really helped me.  I have become acutely aware of how crooked 95% of horses and riders are – including myself and my own horses.

First, lets look at ways to observe crookedness in horses.  I recommend doing a mini “case study” on a horse to improve your ability to recognize the many ways in which our horses can be crooked.  Find a good basic drawing of a horse online and record your observations visually on there. A good one can be found here: http://www.horse-stall.net/coloring-pages/horse-19.gif

Here are some points to note:

– When grazing or eating hay off of the ground, which front hoof does the horse normally have forward? This hoof will often have a more dished appearance.

– When standing square, is the horse asymmetrical?  Does the neck bend one way or the other?  Is one shoulder more developed than the other?  Are legs straight?  Does the horse consistently have trouble standing square and want to stand in a particular way? Is one side of the rump higher than the other?  Note the shape and asymmetry of the hooves.

DSCF0020

Is the rump symmetrical?

– When you lift the horses hooves to pick, do you meet any resistance? Are there consistently behavioral problems with a specific leg or hoof?

Does the horse show any resistance when picking up their hooves?

Now it is time to introduce movement.  At a standstill, introduce some stretches and bodywork techniques that address the horses body laterally.  Basic Masterson Method techniques are very helpful for doing this. More information on this method can be found here:  www.mastersonmethod.com.  Jim Masterson’s book, “Beyond Horse Massage,” can be a very helpful tool.

– Are you met with more resistance stretching the horse in one direction over the other?

– Do you get more “responses” (i.e blinking, softening of the eye, shifting of weight, swishing tail) or “releases” (i.e licking and chewing, yawning, rolling back the third eyelid) during specific maneuvers?

– Do the muscles feel physically tighter or “lumpy” in a specific area of the horses body?

Now, ask your horse to circle you at the walk trot and canter if possible.

– Is there a soft bend through their entire body? (Although there is obviously much less flexibility in the body than the neck, the horse should feel bent around you on a circle.)

– Does the horse have trouble stepping under their body with one hind leg more than the other?

This is a good example of the inside hind stepping nicely under the horses body.

This is a good example of the inside hind stepping nicely under the horses body.

And now, it is time to mount up.

– Ask the horse to bend laterally.  Is one side stiffer than the other?  When riding does your horse turn one way easier than the other? Can you see one eye more often than the other?  Is one ear tip higher than the other?

This illustrates a soft lateral bend and the inside hind stepping under the body...

This illustrates a soft lateral bend and the inside hind stepping under the body…

– Ask for a back.  Does the horse consistently turn it’s hindquarters one way or the other when backing?

– When walking, trotting and cantering does the horse lean on your aids in any way?  Do they feel heavier in one rein over the other?  Do they drop either of their shoulders or blow through your aids anywhere?  Do they drift to the inside of a circle or cut corners going one way more than the other way?

– Is it consistently hard to pick up one canter lead over the other? Can they maintain the canter going straight?

– If asked for a sidepass, or a leg yield, is one direction more difficult than the other?

Now, on to you!!! Make a diagram similar to what you just did for your horse.

– Which arm do you throw with?  Which leg do you step forward with first?

– If you lie down, is one toe longer than the other?  Are the points of your hips level? Are your shoulders level?

– Do you always sleep on the same side?

– Where is there tension and stiffness in your body?

Pay attention to your own crookedness!  Both on and off of your horse!

Pay attention to your own crookedness! Both on and off of your horse!

It might seem like this all is excessive,  but these questions should help you notice patterns. When I am teaching horses and riders, I am looking at all of this data, and it helps me guide the lesson and training plan.  As you look at the straightness/ symmetry map that you just created notice the patterns.  Obviously the moral of this lesson is that symmetry equals straightness, which leads lightness in your riding and the overall health of you and your horse.  Think about what this map means for both you and your horse.  In my next article we’ll look at various exercises that will help with all the crookedness that you just discovered! In the mean time, keep on being observant of the concept of straightness.  The more you aware of it you are, the easier this will be, and eventually it will just be a part your training reality.

205074_215028601843579_195694623776977_908617_1093775_n

Lessons From Ace


As promised in the last article I wrote about my “perfect” horse Ace, here are some more specific lessons I have learned from him. Hopefully everyone can find some pearls of wisdom in here that will also apply to their horses.


Go With Your Gut, It’s Your Horse –  As horse owners, we rely on a team of experts to assist us in making safe, healthy and smart decisions for our horses.  Veterinarians, Farriers, Trainers and Friends are all part of that team.  Advice is good, especially if it’s from a professional that you trust, but ultimately you must make the call.  Over the years, I have found myself in situations where my gut feeling has contradicted advice of others regarding Ace.  When I have not followed that gut feeling, I have almost always regretted it.  Educate yourself about all things horse as much as possible, this learning will become experience, which will allow you to look at problems critically.  Good veterinarians, farriers and trainers welcome questions, bad ones don’t.  In my experience, it’s that simple.  As an owner, I believe it is your responsibility to ask those questions, even if you feel that you are being a pest.  It is also very important to know your horse and their behavior intimately.  Your team relies on you to know those finer points – the little observations are often the most important part of the puzzle…  There have been times with Ace where I have stood back and watched uncomfortably as a trainer or farrier does something that I didn’t agree with.  It is hard to interrupt and speak up when someone with “authority” is supposedly helping – but your horse is counting on you to do that.  Nonetheless, we are all human, so at least make sure you learn something from those moments…


Know Your Horses Conformational Faults – Every horse is crooked due to stiffness, bracing and conformation. Learn that crookedness so that you can help correct it.  Articles by Dr. Deb Bennett are very helpful resources.  As you watch your horse move, and as you ride, note whether your horses head turns in one way more than another. Does he come in on a circle more one way that the other?   Can he step under himself with his inside hind leg equally in both directions of travel?  Does he have trouble picking up the canter lead one way?  Does he lean on your aids in any way?  These are all clues – so notice this stuff, and then figure out the reason.  Utilize your vet, farrier and trainer to help you.  Learn about equine anatomy and gaits.  If you do all this, working with your horse will become much easier.


Feet First – Most horse owners take their horses feet for granted.  Ace came to me with terrible feet – due to a combination of neglect and conformation. I quickly realized that I needed to educate myself as much as possible about hoof anatomy, trimming, and hoof care if I wanted to help him overcome his soundness issues.  As I noted earlier, a good farrier welcomes questions and observations.  You see your horse everyday.  They see him once every few months.  The farrier-owner relationship should be full of dialogue, and the more knowledgeable you are about everything hoof, the better this dialogue will be.  There are many styles of trimming and shoeing out there, and it is your responsibility to find the one that works best for your horse.  Beware of farriers and trimmers that are “religious” about only one style or product.  A competent farrier or trimmer has many tools in their toolbox, to suit the huge range of horses and disciplines out there.


Remember To Release!! – Ace is an extremely sensitive horse that used to be very explosive.  That is because I was trapping him with my aids because I didn’t know better. He used to rear so high that I thought we were going to flip over backwards.  Always give your horse an “out.”  Remember that horses learn from the release of pressure, not the application of it.  Pressure can come from many things including most obviously – your reins, your legs and your seat/balance.  But it also can be your voice, your body language, the swinging of a rope, the angle of your body, an obstacle, etc… Start thinking critically about how many forms of pressure you are applying to your horse, and why.  Make sure your actions are intentional. Conversely, also make sure that you are not releasing unconsciously – which will just reinforce unwanted behavior.  Remember that adjusting your reins, changing the tempo of an aid, looking away, stopping to regroup all can be interpreted by the horse as a release.  So set yourself up for success before you start…


Quiet Hands, Quiet Mouth, Get an Independent Seat-  Work on your balance as much as possible.  If you can take lunge lessons on a safe horse with a good trainer, do it.  That is the best way to get an independent seat.  Strengthen your core, and educate yourself about your breathing (or lack thereof!) Bring your breathing down from your shoulders, deep into your core below your belly button. If you can stay balanced on your horse without relying on your reins or gripping legs, your communication with him will be much more clear.  Then you can stay off of his mouth.  Most horses will lean into unyielding pressure, so if you are always clamped down with your reins, they will mimic that intensity of pressure and constantly pull on you.  I know that it is scary to let go though – I struggled with it for years.  Your horse WILL slow down and quiet down if you stop trapping him with your aids.  Try softening your outside rein, and redirecting your horses energy into serpentines and bends, rather than fighting with them…  Quiet hands does not mean giving up control.  It means that you are creating consistent boundaries, and then asking your horse to meet you there.  Stay steady and quiet with your contact, and remember to release when they soften.


Vary Your Exercise Routine – Rote ringwork is the easiest way to sour a horse.  Cross training is so important, both physically and mentally.  Whatever your discipline of choice is, try something new.  Trail riding can help develop natural impulsion and improves any horses walk.  Cavalettis help regulate cadence and help lift the back.  Basic classical dressage principles will help your horse learn to carry themselves better.  Groundwork will strengthen your communication and bond with your horse, and in my opinion, is absolutely essential.  Versatlity and obstacles encourage your horse to think independently, and will test your horses responsiveness.  And above all, cross training should help you remember that riding and working with your horse should be enjoyable.  If it isn’t, figure out why.


Redheads Are Sensitive! – I try to avoid stereotypes in general, both in and out of the horse world, but some are true.  Ace is a chestnut with a flaxen mane and tail, and chestnuts are definitely more sensitive both physically (bugs bother them more) and mentally (they demand quiet riders).  So are grey horses.  Bays are usually more steady eddy.  Some breeds are more sensitive than others (Thoroughbreds, Arabs, Morgans).  Owning up to these realities make your life easier, so just do it…


Ride Other Horses – Over the years, as I have been able to ride more and more horses, I have gained more and more tools to apply to Ace. You have to approach every horse differently, and those subtleties are great opportunities for learning.  Also, if you need to improve your own riding or horsemanship, get on a more trained horse and do that under the supervision of a good instructor.


Keep Trying, and Be Patient With Yourself and Your Horse –  Stick with it, and your efforts will pay off.  Try to not lose your temper both with yourself and your horse.  We all have bad days and good days, so just roll with it, and learn from your mistakes.  Your horse will forgive you, that is why they are so special.  Become more aware of your emotions and it will be easier to control them.  The more zen of a state you can be in when working with your horse the better your results will be.  Take some lessons from a martial art or meditation.  Learn to redirect your and your horse’s emotions rather than squashing them.  And above all, always remember to breathe.

Best Bud


In Short, He Was The Perfect Horse

“You are trapping your horse,” my old instructor said many years ago… In the moment, that meant nothing more to me than she was unhappy with my riding, and I needed to fix that.  The complexity of that statement was uncomprehendable to me, and I was nowhere close to being able to fix the problem.

In an immediate sense, “the problem,” was my Appendix gelding Ace.  He hated ring work, responded to rein pressure by speeding up uncontrollably and racing through my aids, and would rear up very high in resistance.  He often succeeded in getting his tongue over the bit even with a flash noseband, and felt like a 50 lb sack of feed on the end of the reins.  He also stumbled and was generally unaware of where his feet were.  In short, he was the perfect horse for me.

DSCF0066

Wait, what?  That must be a typo you say… Nope, he was, and still is the perfect horse for me, and has played a huge role in my journey as a horsewoman.  When I met Ace he was 3 years old and so skinny and malnourished that he lost all of his hair in the dead of winter as part of his body’s rehabilitation process.  He was big, clumsy, rude and didn’t like people.  He would run right over you, would not let you anywhere near his head, and was ugly to boot! He was gangly, had patchy bald spots, and terrible feet.   In short, he was the perfect horse.

The lady that had recently rescued him encouraged me to work with him, and I reluctantly began to.  Slowly, over the months, he gained weight, grew in a sleek summer coat, and gradually became comfortable with me touching his face and ears.  We chipped away at his ground manners, and he improved a little more every day.  He was becoming my bud, and the gal who rescued him saw that and decided to give him to me.  He became the first horse that I owned and was responsible for independent of my parents.

DSCF0021

One day, when I had walked deep into the pasture, down by the river under the cottonwoods to catch him, I decided to hop on bareback with only a halter and lead rope to ride him back to the barn.  At this point, I had only ridden him a few times, but  the desire to save some time overrode logic.  As we rounded the corner, he broke into a canter and I had no choice but to just let him go.  I remember that ride to this day as one of the most free moments I’ve ever had on a horse.  It was smooth, fast, and absent of any resistance – complete harmony – because I had no choice but to stay out of his way.

As Ace became more fit and healthy I began to ride him more.  His previous owners, who had severely neglected and abused him, also had supposedly ridden and shown him extensively despite his young age.  At the time, in my naivety, that gave me the green light to just begin riding as if he was a fully trained – well trained – horse.  Behavioral issues immediately began popping up.  Generally, Ace was pretty willing on a trail if given his head, but when asked a question, you could pretty much expect resistance.  Despite our challenges, he was my horse, and I loved him.

Over the years he stayed with me through multiple relationships, many different barns and pastures, and eventually made the cross country drive from Montana to Maine with me.

233_19209306277_9723_n

233_19209406277_4751_n

We dabbled in many disciplines.  I trained him to drive – and he quite liked it.We schooled on cross country courses jumping stone walls, into water obstacles, and over giant logs.  We trail rode the ranch where Seabiscuit lived. He helped me train my younger gelding by ponying him on busy roads and up the sides of mountains.  All the way, we took 2 steps forward, and 1 step backwards. He was there when I got married, and when my son was born.   Best Bud

Now, he gives my son pony rides and nibbles on his hair.  Even though I am not riding him much at the moment, (full time horse training and 1.5 yr old son = little  time for my own horses) our journey together is far from over. In short, he is the perfect horse for me.

Ace continues to challenge me for better or worse, always sensitive and reactive.  Over the years, I have begun to realize that those traits are a gift, not a curse.  This one horse has pushed me to constantly learn from my mistakes so that I can better our relationship. And I guess this is what I wanted to get across in writing this.  No horse is ever “perfect” in the dictionary sense of the word, nor are our relationships with them ever perfect either.  But the moments in which we truly learn, and better ourselves, and better our relationships with our horses are rarely the “great” moments.  They are usually the tough moments, where perhaps you don’t meet eye to eye, or where perhaps you or the horse doesn’t deal with a situation in the best way.  And then, some time passes, and you look back and have a realization – you learn from the mistakes you made.  Sometimes a horse is only in your life for a short period of time, and sometimes a horse truly isn’t the right horse for you long term – but that doesn’t meant that you can’t learn from them.  If you teach yourself to look inward for the lesson in all of life’s challenges,  than your horse can become the perfect horse for you as well.

DSCF0020


Stay tuned next for specific lessons that I have learned from Ace, some of which might help you too!

There Are No Shortcuts With Horses

Image

Last week, I had a great stretch of rides and lessons.  As I looked back on them, trying to figure out why all were so productive and successful, the answer quickly became clear.  I had taken the time and effort to set up every training session for success.  That might seem overly simple to you, or perhaps you are thinking – duh – obviously that is what you should do… But how many of us do that day in and day out??

I know that I am slowly learning to do this, but it is not yet second nature, and I continually have to remind myself to slow down, and really take whatever time is necessary, even when I don’t necessarily have the time!

Those of you that own horses know that something always comes up that can pull your focus away from your ride or training session.  There are always chores hanging  over your head, some sort of health problem, another horse or rider distracting you… In the long run though, it is most efficient to give whatever task is at hand your full attention.  It is easy for me, when I have a tight schedule of training sessions and rides, to approach them with less thought and intention and presentness than I really should.  This inevitably leads to less productive rides, which is in the end, less efficient use of my time.  Specifically, what do I mean?  I have touched on many of these points before, but I will summarize again:

1. Approach your training sessions with a positive outlook.  No defeatist attitudes and statements.  That is the crux of intentional horsemanship – we all have the ability to manifest our realities.  If you say it or think it, it can be so.  Too often, this shift in mindset is all that is needed to fix a problem.  I was working with a young mustang baby and her owner the other day on lessening her anxiety when separated from her herd mate, when this concept was really illuminated.  When the filly’s anxiety began to increase,  the owner, an incredibly kind and competent lady, said “Oh no, this is how she gets, now were going to have problems…”  She was obviously speaking from a point of anxiety herself, but that sort of defeatist mentality just amplified the scariness of the situation for the filly.  For the horse, she initially got nervous because her pasturemate left.  Then the owner confirmed that yes, this is indeed worth getting nervous about by mirroring the filly’s emotions.  When we changed this, and projected calm and secure emotions, the filly began to feel safe, and in turn mirrored our emotions.  The effect was immediate, and surprised the owner at first, but what a great, simple logical concept?!  Go into your training session with positive and focused intention, and you will be more successful.

2. Begin with a goal in mind, but be able to adjust that goal if necessary.  Riding is a partnership, and sometimes horse and rider both “bring their left feet to the dance.”  Addressing why that is the case is more important than pushing through towards your goal.  In the long run, it WILL get you there faster.  I wanted to work on posting with one of my students last week, but her horse was tense and uncomfortable when he came in.  We spent the first half of the lesson doing bodywork to help him relax and release that tension.  In the second half, I had her ride with a bareback pad, and the horse was the softest, most supple, straightest I have ever seen him be.  What she was able to learn and feel in that ride was way worth the extra time.

3.  Take that time to assess how your horse is feeling, and then take the time to work on any tension or uncomfortableness the horse may have – either physically or mentally.  Do the same for yourself. – If you are tense or anxious going into the ride, work on it BEFORE you start working with your horse.  Do some breathing exercises, change your mindset.  Use your grooming time to relax yourself while relaxing your horse.  If you are physically tense, stretch yourself!  I have a student that used to whirl into her lesson and I could tell her brain was still going a mile a minute from the business of her day.  She had allowed this to permeate her body and she would be tense and unfocused.  I finally paired her up with a horse that would immediately react to that energy and mirror whatever every she brought to the ride.  It has been great to see how this horse essentially acted as a big mirror in which this person could see how her energy was influencing the situation.  Horses are great at reflecting externally your internal emotional state.  Allow them to do that, and learn from it.

4. Ride with intention – ride an obstacle, ride a pattern, or ride towards a physical goal to keep your riding focused and intentional.  In an arena, dressage letters are very helpful. Be aware of your every movement, and how it influences your horse.  Don’t let this tense you up though, sometimes it is helpful to imagine looking down at yourself to “feel” your ride.  Or close your eyes occasionally, and really just feel the horses and your movement.

5.  Stop when you are ahead.  End on a good note, not at a fixed time.  As an instructor, that means I might end a lesson before the time is officially “up.”

I’m sure that there are many more things to do to set yourself up for success when working with your horse.  Anyone have any other suggestions?

Nagging is a No No

Nagging is something that we all do at one time or another, both while working with our horses and just in life in general.  One of the riding instructor’s most important jobs, in my opinion, is to help their students remember to not nag. First off, how do I define “nagging?”  To me, it comes down to unclear repetitive use of the rider’s aids with little or no release.  For example – someone who clucks repeatedly at their horse as they trot around is nagging.  If you squeeze with your leg at every stride you are nagging.  If you seesaw on your horses mouth continually with your hands you are nagging. All of these actions do one thing, they dull the horse to your aids and cause them to brace.

In the world of horses I see nagging arise for two reasons.  First, riders often are trying to be kind or nice to their horse by applying aids more gently – but end up having to apply them repetitively to hold their horse up.  Second, riders often nag from a position of being unaware.  Most riders that nag aren’t even aware they are doing it, as it has become second nature.  And guess what?? Your horse has tuned you out too, so they are not aware either.  Nagging riders create dull horses, and dull horses are a real bummer to ride.  Why do you think a lot of school horses are dull?  Because they have essentially tuned out because of repetitive nagging and inconsistent aids.  All the time I see people pass judgement about horses that have gotten to this point who claim that it is the horses personality, not a learned behavior.  Granted, I do think that some horses are more prone to becoming especially dull – but I often find that it is actually really sensitive horses that become dull as a protective mechanism.

So lets return to our two reasons for dullness.  First – the rider is trying to be “kind” with their aids.  In my training, I have a very specific sequence of aids.  First, I ask with my voice.  Second, with my physical aids – i.e leg, reins seat etc… Third, I follow through with a tap of the whip. If the horse doesn’t respond, I up the ante until they do.  That might sound harsh, so let me clarify two things.  First, it is imperative to be very cognizant of whether you horse understands what you are asking.  It’s not fair to up the ante if your horse simply doesn’t understand what you are asking.  Second, upping the ante doesn’t mean beating a horse.  If that triple sequence of aids doesn’t work, there is likely confusion or pain on the horses part and you must address that before proceeding.

STAY TUNED FOR PART TWO – ADDRESSING SOLUTIONS AND RIDER AWARENESS – I.E INTENTIONAL RIDING